How to make a festive crown
Get crafty this Easter bank holiday and learn how to make a festive crown from sustainable wood and leaves, perfectly unique and fun for spring time, featured in Slöjd by Kerstin Neumüller.
Words by Kerstin Neümuller.

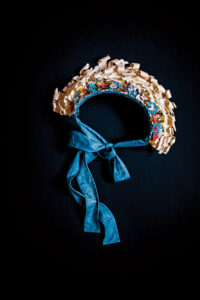
Simple elegance has its place, but sometimes you need a flashy crown to brighten up the mood. This piece is inspired by the traditional headwear called ‘lad’ that is a part of the folk costume of Malung. Such crowns are worn by brides for weddings, but my crown can be worn by anyone, anytime. The crown consists of a base made of corrugated cardboard that I have bent into shape, dressed in fabric and then decorated. Two tie bands at the neck keep it in place.
YOU WILL NEED :
- A piece of corrugated cardboard approx. 50 x 20cm (19½ x 8in)
- Pen
- Scissors
- Ruler
- Fabric to cover the crown with
- Glue gun and glue
- Wood shavings or dried leaves
- Coloured drinks cans
- Beads
- A nail
- Hammer
METHOD:
Make a base
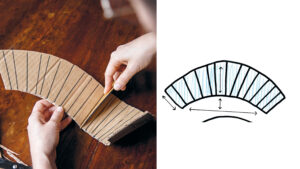
Start by drawing out the shape of the crown on the cardboard and cut it out. Take out the fabric you want to cover the crown with and use the cardboard as a template for cutting out two fabric pieces that are approximately 2cm (¾in) larger than the template on all sides.
Now start shaping the cardboard base by folding it according to the markings on the template.
I used a ruler that I bent the cardboard around to control the folds, which otherwise like to follow the corrugated cardboard structure. I placed the crown-to-be on my head to check the shape and folded and bent it until it had a rounded shape that sat well on my head.
Cover the base in fabric
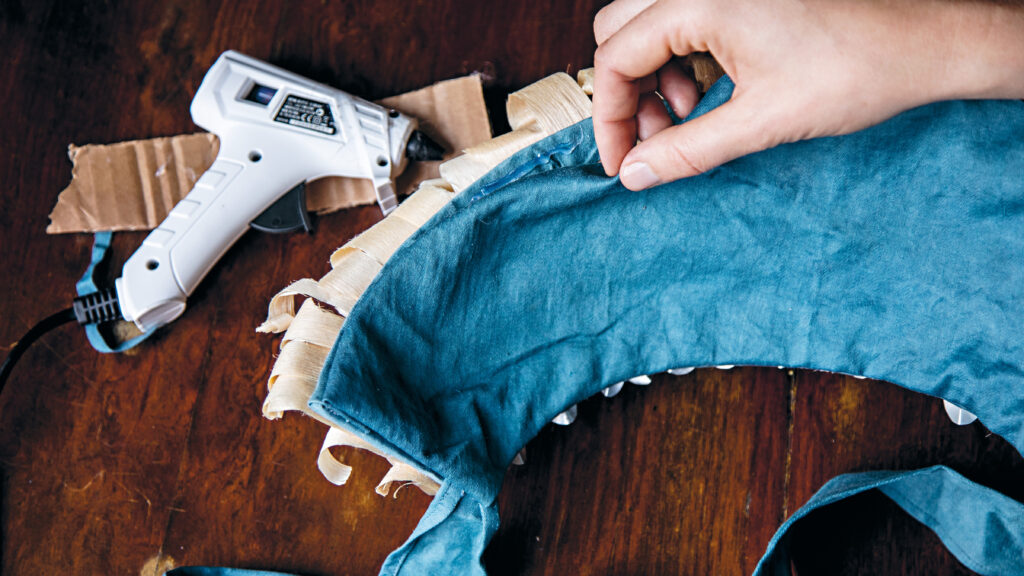
Now cover the front of the base with one of the fabric pieces. Place the folded cardboard piece on a table and straighten out the fabric over it. Let it stand up; don’t press it flat against the table as it will lose its shape. I straightened the fabric with my hands over the base and the edges of the fabric protruded fairly evenly around its edges. Then I took out the glue gun and secured the fabric by alternately gluing at the top and the bottom of the crown so I could stretch out the fabric while I glued to make sure it got completely straight. The fabric was folded and glued to the back, and here it can be tricky: along the bottom of the crown it will become difficult to fold the fabric around the edge. Make a few cuts along the edge of the fabric and it will be easier.
You might think it’s unnecessary to cover the crown in fabric when it should be covered in wood shavings anyway, but I didn’t want to risk any cardboard being visible in between the shavings, as it would ruin the festive feel.
Decorate the crown
I knew I wanted to make flowers from drink cans for my crown, but I needed something beautiful to fill out the rest of the surface. On my workshop floor there were some extra nice wood shavings that got the honour. I glued the shavings on overlapping so that they covered the whole surface of the crown. I started to glue a row along the top edge and then worked my way down. If you don’t have wood shavings at home you can use something else. Dry, flat leaves I think would look great!
Make some metal flowers
Gather together different aluminium drink cans in colours that you like. Cut off the bottom and the lid (using scissors you’re not too precious about) so that you get a flat metal sheet. Wash the metal sheet clean and bend it so that it lies flat.
Cut out two paper templates in the shapes of a larger and a smaller flower. Draw the flower shapes on the metal with a biro and then cut them out. I folded the petals one by one with my thumbnail to give the flowers shape, then I punched a hole in the middle of each flower using a hammer and a nail. Make sure you hammer onto a non-delicate surface so you don’t get marks on your table; a chopping board works fine.
Assemble several flowers
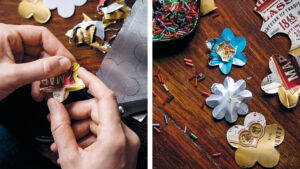
I attached a small flower inside a larger one by running a threaded needle through both, then adding three glass beads to the needle and turning back again through the same hole. On the back of the flower, I secured the threads by tying the ends onto a small bead. I attached the flowers to the crown using a glue gun and complemented them with small golden leaves cut out of a caviar tube.
Add the ties
When I had finished decorating the front I glued two ties to the back of the crown, one to each bottom corner. I made the ties from the same fabric in which I covered the crown by cutting two long strips that I hemmed. You could use ready-made ties or ribbons as well.
Cover the back of the crown with fabric
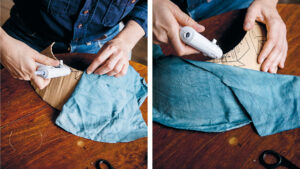
Finally I covered the back of the crown with fabric by placing it flat against the cardboard, adding a string of glue approximately 5cm (2in) from the edge of the base between the cardboard and the fabric, then pressing together the fabric and the glue. The aim with this step is to get the fabric flat against the inside of the base, while the last 5cm (2in) towards the edges are loose. The next step is to fold in the edges of the fabric, so that the folds sit evenly with the edge of the crown, then glue them down so that no raw or frayed fabric edges are visible.
The finished crown
More about Slöjd
A book for anyone who craves making something with their hands – featured in the book are 18 different wood and textile projects suitable both for beginners itching to get started and for those who already know that handicrafts are the most enjoyable hobby you can have!

Slöjd: The Swedish art of woods and textile handicraft by Kerstin Neumüller is available to purchase online via our website here and from all good booksellers.
Photography by Ellioner Hall.
